Saturday 14 June 2014

Testing real-time mapping on Sjernarøyane archipelago

I was quite happy with the real-time map from the hike to Preikestolen yesterday. There were some issues with the SPOT Satellite Messenger I'll write about later. First I want to make a second test on a biking trip to Sjernarøyane archipelago.

We'll bring a normal GPS on the trip, to be able to check the accuracy of the SPOT Satellite Messenger.


[ Fullscreen map ]

We'll start biking about 9:15 am (Central European Summer Time) Sunday June 15th. New positions should appear on the map as we bike (every 5 minutes), but you still need to refresh the page to get new Instagram photos.

Update: Test results

I'm much more satisfied with the performance of my SPOT Satellite Messenger on this trip. I brought with me a Garmin GPS to get the full track of the biking trip, and it's shown as a blue line on the map.

The track shows an overlap between the SPOT positions and the Garmin GPS.

Automatically retrieving place name, terrain type, altitude and weather works.
The weather forecast is not always correct, but quite good! 

Not all Instagram photos are correctly positioned.
I will try to turn on the phone GPS if the mobile coverage is poor.
The maps looks crowded with many photos. I'll try to adjust the thumbnail size.

Overall, quite happy with the test results! :-)

Thursday 12 June 2014

Testing my real-time expedition map to Preikestolen

In my previous blog posts, I've worked on the various parts of an expedition map that I plan to use on a 4-weeks hike between Oslo in Bergen. Now I'm ready for a test run. Tomorrow Friday, I'm leaving the island for a hike up to Preikestolen.

From one of my previous trips to Preikestolen. 

It's a short but scenic hike, just 4 km each way. It should be sufficient to test if the various parts of the my live tracking map:
If you have nothing smart to do, and if everything works, you can follow us on this map from around 11 AM tomorrow (Central European Summer Time), Friday June 13th. 


[ Fullscreen map ]

New positions should appear on the map as we walk (every 5 minutes), but you need to refresh the page to get new Instagram photos.

Update: Test results

I was not too impressed with the performance of my SPOT Satellite Messenger on this trip.

The tent marker (placed by clicking on the custom message button) is correctly located,
but the time, and thereby the dotted line, is wrong.
It seems to be because of dense woods where i pushed the button,
and the time recorded is when it's received and not when the button is pushed.
Note to self: Don't use the buttons while walking. 

Luckily, I didn't fall off the cliff as the map indicates, so that position is clearly wrong.
Note to self: Turn off tracking while stopping at a location, especially when making "strange moves".
Note to self II: Tell family and friends that they should rely 100% on what they see on the map.... 

The SPOT stopped tracking at the bottom right position,
and I got no positions before we reached the end (by the photos).
It's a bit strange because it had no difficulties in tracking the start of the trip - in a similar terrain.
Note to self: Make sure the SPOT is in a visible positions on the top of my backpack.
The density of the tracking points will vary in dense woods and/or steep terrain.

Most were, but not all Instagram photos were correctly positioned.
The photo above should be by the tent marker, but is a few km further west.
As the SPOT was also struggling here, I guess it's due to poor mobile coverage. 

See also comments.

Bonus material: A photo sphere from Preikestolen :-)

[ Fullscreen ]

Showing Instagram photos and videos on a Leaflet map

I've created a new plugin, Leaflet.Instagram, that allows you to add Instagram photos and videos to your maps. You can load photos with the Instagram API or from CartoDB.

You can choose to show your images in a popup or a lightbox. The small images on the map can be clustered. 

The plugin is very easy to use:

L.instagram('https://api.instagram.com/v1/users/209969753/media/recent?access_token=your_access_token').addTo(map);

Just add the url and endpoint to the Leaflet API together with your access token. If you don't want to expose you're access token, I suggest that you create a proxy or sync your data with CartoDB. The plugin has built-in support for CartoDB:

L.instagram('http://turban.cartodb.com/api/v2/sql?q=SELECT * FROM instagram WHERE the_geom && ST_SetSRID(ST_MakeBox2D(ST_Point(5.952, 59.329), ST_Point(5.982, 59.342)), 4326)').addTo(map); 

Using CartoDB has the added benefit of allowing a wide range of spatial queries. In the query above I'm only fetching images within the geographic bounds of the island. 

The interactive map looks like this (try it in fullscreen!):


Click on a image to see a bigger version or to play a video. 

Wednesday 11 June 2014

Syncing your Instagram photos to CartoDB

I really want to show photos on my expedition map. Instead of creating my own photo service, I want to use a service that already support geotagged photos, Instagram. To get more control, I'm syncing the metadata for my photos and videos to my CartoDB-account using the Instagram API.

CartoDB-map showing Instagram photos.

Please read the API Terms of Use before you start doing this. You shall not "cache or store any User Content other than for reasonable periods in order to provide the service you are providing to Instagram users". Here I'm only syncing textual data from my own user on Instagram. You can also show your Instagram photos on a map, using the Instagram API directly, as I will show in my next blog post. 

I've created a PHP cron job, instagram2cartodb.php, that will sync my photos and videos to CartoDB:


The script will read the latest images from an Instagram user using an access token. It also reads the latest timestamp from the CartoDB-table, to check which images are newer. I'm only storing geotagged images and videos, as I want to show these on a map.

I've created a CartoDB map of my photos from Foldøy island using this short tutorial on info-windows with image support:  


In the next blog post, we'll put our Instagram photos on a custom Leaflet map.
   

How is the weather at this latitude, longitude location?

In my last blog post, we saw how to find the name and altitude of a latitude, longitude location. Today, I want to see what the weather is like. In Norway, we have a great free weather service, yr.no, that also comes with an API (with world coverage!). I'm going to use it to log the weather on my expedition map.

yr.no is a joint weather service from the Norwegian Meteorological Institute (met.no) and the Norwegian Broadcasting Corporation (NRK). yr.no is unique in Europe because of very detailed weather forecasts and a free data policy.

I'm using the location forecast API (terms of use), which returns the weather forecast for a latitude, longitude location:

http://api.yr.no/weatherapi/locationforecast/1.9/?lat=59.33895;lon=5.96639

It returns an XML with a 9 days forecast starting from the current hour. I'm only logging the current time forecast for my expedition map.

I know it's totally useless, but this is my SPOT logging my current location so I can find the weather without looking up on the sky... 

I've made a PHP cron job that that adds weather data to my SPOT Satellite Messenger locations, that are already synced to CartoDB. For these locations I already have the latitude, longitude and the time it was recorded.


I'm first asking for a full weather forecast from the API. Then I'm using XPath to find the weather for the nearest hour. Data on temperature, precipitation, wind and the weather symbol is added to the CartoDB-table. I'm also calculating the sunrise and sunset time to get the correct weather symbol (to show the sun or the moon).

The weather data will be shown in the popups, and I'm going to play with the weather recordings after my expedition.

Showing the weather on the same location as the photo above. It's a bit chilly today with 14°C, sunny and a moderate breeze, 7 m/s from southwest - which is quite correct from my real-time experience :-) 

So, we've enriched our satellite positions with location and weather data. But what would an expedition map be without photos? It's the topic of my next blog post.   

Friday 6 June 2014

Finding the name and altitude of your location

If you know the latitude and longitude a location, how can you get additional information about the place? There are a lot of APIs and web services that will tell you. This blog post focuses on a web service from the Norwegian Mapping Authority, which will give you the name, altitude and terrain type of your location.

In my previous blog posts (1, 2, 3, 4) I showed you how to use a SPOT Satellite Messenger to track your trips. This will give you a series of latitude and longitude points, and the time they where recorded, but that's about it. For my expedition map, I'm especially interested in the altitude of my location, which can be used to draw a height profile of the track. I would also like to show the name of the places I've been.

Luckily, the Norwegian Mapping Authority ("Kartverket") provides such a service with a great level of detail. The service allows you to send in a latitude/longitude position, and obtain the altitude, nearest place name and the terrain type. The service is described in Norwegian on this page.

Let's try with my current position:
  • Latitude: 59.339
  • Longitude: 5.967
This URL will give you some facts about the place:

http://openwps.statkart.no/skwms1/wps.elevation?request=Execute&service=WPS&version=1.0.0&identifier=elevation&datainputs=[lat=59.339;lon=5.967;epsg=4326]

The WPS format is quite verbose, but you should be able to parse out the data you need:

What does it tell me:
  • I'm just 3.6 meters above sea level.
  • The terrain type is "Åpent område" (open area)
  • The nearest place name is "Norde Breivik"
  • The place id (SSRID) is 1196378. I can use this id to get more information about the place.
Everything seems correct from where I'm sitting :-)

Photo of my location from last evening.


I've created a PHP script to parse out the values from the XML. I'm running this script as a cron job to
add information to the SPOT Satellite Messenger locations I already got in CartoDB.

I'm then able to show information about the track in the popups:


In the next blog post, we'll add some weather information to our map.

Thursday 5 June 2014

Real-time tracking with SPOT and Leaflet

I've created a new plugin, Leaflet.SpotTracker, that makes is super easy to add real-time tracking to your maps. The plugin displays tracking data directly from a SPOT Satellite Messenger, or from CartoDB.

One line is enough if you're using the SPOT API:

L.spotTracker('your_feed_id').addTo(map);

This API has a request limit (500 requests within 15 minutes) and it will only fetch the last 50 messages from the last 7 days. I therefore recommend to sync your messages to CartoDB, or similar storage options. You can also load tracking data from CartoDB with the plugin:

L.spotTracker('your_feed_id', {
    api: 'http://turban.cartodb.com/api/v2/sql',
    url: "{api}?q=SELECT * FROM spot WHERE feed_id='{feed}' ORDER BY timestamp"
}).addTo(map);

A few examples from my kayak trip around Foldøy island (it will work better for longer expeditions):

The plugin will draw a line between all locations recorded, and you can style the line as you like.

You can add clickable dots or markers for each location.

Different message types can be styled differently. 

A pulsing marker will show where you currently are:


[ Fullscreen map | Code ]

This is the first version of the Leaflet.SpotTracker plugin. Please report any issues you might have on GitHub.

Wednesday 4 June 2014

Real-time mapping of your trip with SPOT and CartoDB

In my last blog post, we saw how we could synchronize data from a SPOT unit to a CartoDB table. Today, I wanted to test if the system worked. As I'm currently staying on a small island, long hikes are very limited, so I decided to go around the island with my kayak. It takes me about an hour.

GPS studies on a small island can be extremely hard :-)

Before I started my journey, I created a new shared page on my SPOT account. I also adjusted the tracking interval on my SPOT to 5 minutes, which would give me about 12 locations around the island.

The shared page need to be "Active" to have access to the location feed. 

This gave me an URL to a public map (valid for 7 days only!): 

It's not the best design I've seen, but it works. We'll soon create our own map. 
The map URL also gave me the feed id: "0pGqOT43h6tTRcGJujqltqRYE3rHNu6db". With this id we have access to a feed with our locations, updated real-time:
https://api.findmespot.com/spot-main-web/consumer/rest-api/2.0/public/feed/0pGqOT43h6tTRcGJujqltqRYE3rHNu6db/message.json

I've made a copy as the locations will be deleted after 7 days:


I also started my cron job from last blog post, so the location data was automatically synced to my CartoDB-account. I'm including the feed id in my spot location table, so I can have store multiple trips in the same table by filtering on the id:

SELECT * FROM spot WHERE feed_id = '0pGqOT43h6tTRcGJujqltqRYE3rHNu6db'

Then it was easy to create a simple map in CartoDB just showing the locations:

In the next blog post, we'll create a more custom map experience with Leaflet. Stay tuned!


Tuesday 3 June 2014

Syncing data from your SPOT Satellite Messenger to CartoDB

In my last blog post, we looked at how you can track your trips using the open API of the SPOT Satellite Messenger. A limitation is that you can only get your locations from the last 7 days, and the web service has request limits (500 request within 15 minutes). To avoid these limitations we can sync the data to a CartoDB account using a PHP cron job. CartoDB is a great choice as it allows us to both visualize and to query our tracking data.

A cron job is a script on the server running periodically at fixed times, dates, or intervals. I've created my cron job in PHP, but you can choose the language you want. What you need is a server which allows to run scripts repeatedly. I'm using the cron job support from my hosting provider, Bluehost. As I'm tracking my position every 10 minutes, the cron job is running at 10 minutes interval to sync the data.

CartoDB is providing a simple PHP library to make use of the CartoDB API as easy as possible. The library allows us to authenticate (using OAuth) and run SQL queries on our CartoDB account. You don't have to authenticate to read data from the SPOT API, but you need to create a shared page to obtain your feed id.

In my PHP script, I'm first reading the JSON feed from SPOT, and the last timestamp from my CartoDB table. Then I'm looping through the tracking points from SPOT, and if the timestamp is newer, I'm adding the point to CartoDB.


You need to add your feed id from SPOT and your CartoDB credentials. Remember to create the table in CartoDB before you run the script! The PHP script is available on Github. Feel free to improve it!

In the next blog post, we'll display the tracking data on a map. 

Real-time satellite tracking for your expeditions

On my 4 week hike between Oslo and Bergen, I want to show my real-time location on a map. I could use an app on my mobile phone, but mobile coverage and electricity supply is sparse in the Norwegian mountains. Instead, I've acquired a satellite messenger which sends my location every 10 minutes.

There are different providers of satellite messengers like DeLorme InReach and SPOT. Although InReach seems to have a better satellite coverage in Norway, I decided to buy a SPOT Gen3 because of the open data API. My plan is to match my own tracking data with other location services.


The SPOT Gen3 has 5 buttons:

Help button to alert my personal contacts
that I need help in non-life-threatening situations. 
S.O.S. button for emergencies only.
Custom Message: Set up a message before leaving to send
to contacts with my GPS location.
Allow friends and family to follow my progress
in near real-time.
Check In: Let family and friends know I'm ok.

I hope not to use the Help and S.O.S. buttons, which leaves me three buttons to share my location and tell how I'm doing. My plan is to use the Check In button when I stay in a cabin, and the Custom Message button when I put up a tent. The Tracking button will be used to send my position every 10 minutes, and to show my location on a map.

The findmyspot.com website allows you to register your device and create a shared page:


This shared page consists of a map with your track, but real map geeks wants real data, - which is luckily available in a JSON or XML feed.

The limitation is that this feed only gives you locations for the last 7 days. As I plan to walk for 4 weeks and want to keep my data for the future of mankind, I need to sync the data to a more permanent storage. This is the topic of my next blog post

Expedition mapping - from Oslo to Bergen by foot

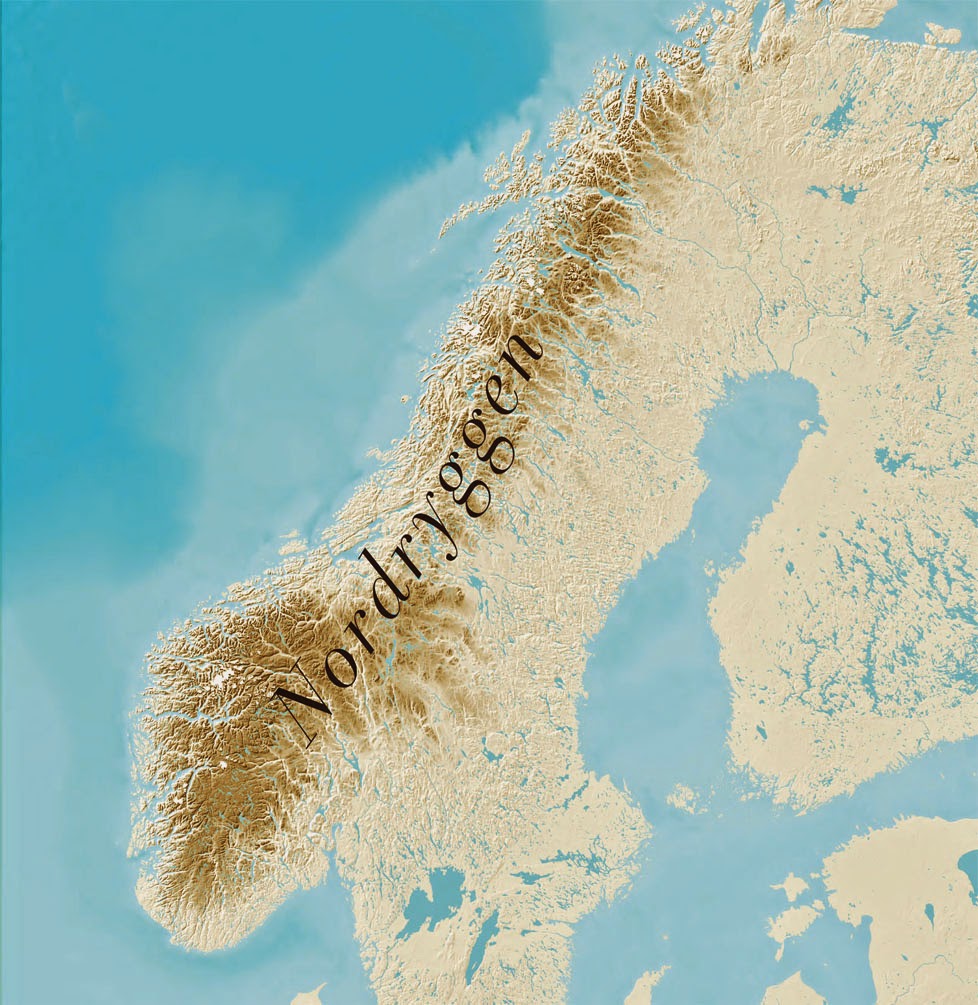
Nordryggen mountain range. Map from fjellkjeden.no.
This is my first blog post in a new series about expedition mapping. I'm currently preparing for a 4 week hike from Oslo to Bergen in August this year. I'll start in my hometown Oslo and walk through the wooden lowlands surrounding the city, Nordmarka. Then I'm heading for the mountains that will take me all the way to Bergen. I'll be crossing Europes longest mountain range, recently named Nordryggen ("the north ridge").  

Of course, maps will be important when preparing, while walking and to document the journey. I've started with a pile of good old paper maps to find the optimal route. I want to spend as much time as possible above the tree line, and it's clearly not the shortest route between the two cities. We have a great network of mountain trails and cabins in Norway, maintained by the Norwegian Trekking Association, and I'll use it's facilities when available. 

I've plotted the planned route on a Leaflet map, starting in the east and going westwards.


There are markers for cabins, and where my tent is the only alternative. A couple of shop markers show where it's possible to get some supplies. I've used the Leaflet.MakiMarkers plugin from James Seppi. This plugin allows you to create map markers using Maki Icons from MapBox. The background map is provided by the Norwegian Mapping Authority. My code is of course available on Github

In my next blog post, we'll look at real-time satellite tracking